Ask what soil to use for a phalaenopsis and you have already made the error the plant will punish. It does not want soil. In the wild these orchids sit perched on tree bark and branch crotches, roots exposed to air, drying within an hour or two of rain. Ordinary potting compost packs around those roots, holds water against them, and suffocates them in a matter of weeks.
Everything about the medium follows from that. It has to be open enough that air moves through it, fast-draining enough that nothing stays wet overnight, slightly acidic, and able to hold on to some moisture and a little food while it does so.
Read the roots before you choose
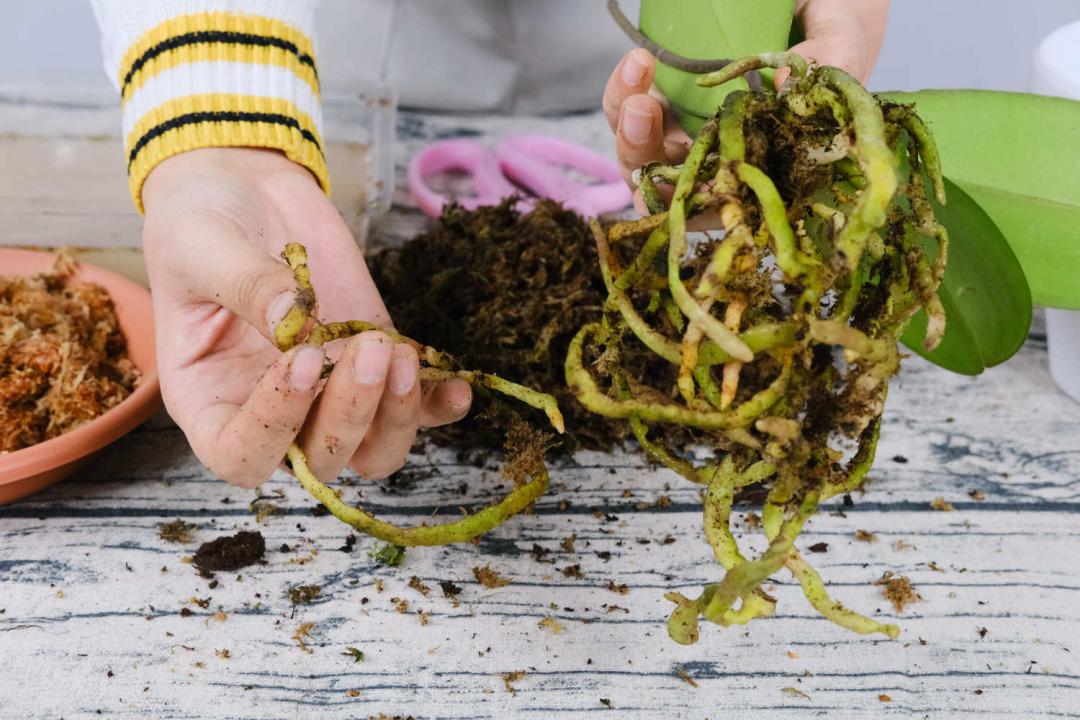
Phalaenopsis roots do something most houseplant roots don’t: they photosynthesise. A healthy root is firm and green when wet, fading to silvery grey when dry, and that colour change is the most useful watering gauge you have. A root that has gone brown, hollow and papery is dead and no medium will bring it back.
So when you unpot a plant, as in the photo below, you are reading the root mass before deciding anything. Green and firm roots mean the current medium has been working. Mostly brown and mushy means the mix has collapsed and is holding too much water, which is the normal reason a shop orchid declines after eight months.
Two ways to get a mix
Buy a bag. Orchid-specific mixes are blended for exactly this problem and they are the right answer if you have never potted one, or if you would rather not learn the components by trial and error. Fine-grade bark mixes suit the small pots that phalaenopsis actually like. This is the worry-free route and there is no shame in it.
Blend your own. The standard components are sphagnum moss, wood chips, fir bark and charcoal. Any of them can be used alone, but a blend does a better job than a single material because each one contributes something the others lack.
- Fir bark is the backbone. Open structure, drains fast, and it slowly breaks down into fines. Medium grade for most pots.
- Sphagnum moss holds the water and the nutrients. Long-fibre New Zealand moss lasts far longer in a pot than the cheap chopped stuff. Use it as maybe a third of the volume, not all of it, which is where most beginner failures actually come from.
- Wood chips or coconut coir add bulk and a little moisture retention without the moss’s tendency to mat.
- Charcoal, roughly a tenth, keeps the mix sweet, absorbs breakdown products, and makes the drainage visibly better. It is the component people leave out and then regret.
A blend that works for most people: two parts fir bark, one part sphagnum moss, one part wood chips, half a part charcoal and perlite.
Note that the requirement is slightly acidic and organic. That is what bark and moss give you as they age. It is also the reason the mix needs replacing every year or two rather than top-dressing: as bark decays it turns to fines, the fines fill the air spaces, and you are back to growing an epiphyte in something close to soil. If you would rather mix the open component yourself than buy bags, how to make pine needle leaf mould covers the free version.
The pot matters as much as the mix
Plastic or ceramic both work. What matters is drainage and air movement.
Choose a shallow pot with holes in the sides as well as the base, or drill them. A phalaenopsis root system is a compact clump of thick roots, not a deep taproot, and a tall narrow pot holds water at the bottom where the roots sit and can’t dry. One size up from where the plant came is plenty. Oversizing is the fastest way to a wet mix that never dries.
Clear plastic is genuinely useful for a first plant, because you can watch the roots change from green to silver and water on the colour rather than on a calendar. If you don’t like the look of a plastic pot, slip it inside a decorative one and lift it out to water.
Some growers use no pot at all: mounted on a piece of cork or driftwood, or set in a shallow basket. That suits the plant better than anything in a container, and it is the option worth considering if your windowsill plants keep declining for no obvious reason.
Repotting, briefly
- Do it straight after the flowers finish, when new root tips are starting, not in the middle of winter.
- Tease the old medium out gently, soak the roots first if they have glued themselves to the pot, and don’t fight it.
- Cut away anything brown, hollow or soft with clean scissors. Leave the firm green ones.
- Set the plant at the same depth, crown just above the mix, and work the medium in around the roots rather than shoving the plant into a hole.
- Water once, then wait a week before watering again. The roots need to recover from being handled.
Do not feed for a month after repotting. Damaged roots burn on fertiliser and the fresh mix has enough in it.
New growth after repotting is also where aphids and scale settle first on an indoor orchid, and a plant with soft new roots cannot be treated as roughly as a primula can. Check the leaf axils weekly for the first month, and go back to the rinse-and-repeat routine at the first sign of a cluster rather than waiting for it to become one.
The short answer
Bark-based, open, fast-draining, slightly acidic, in a shallow pot with side holes, and replaced every year or two before it breaks down. If you want one rule to keep: a phalaenopsis mix should look like something you could walk through, not something you could grow a tomato in.
Pingback: Large-Flowered Cymbidium vs Cymbidium sinatum
Comments are closed.